Awali Golf Club’s PGA Professional Matt Chalmers is helping GulfWeekly Editor Stan Szecowka get a grip with his game. In the second of a five part series of articles he will try to iron out some of the bad habits he has picked up since disastrously taking up the sport four years ago.
Putting is the most important area of golf. It can account for up to half of your score in a round of golf. Strangely enough, however, most people spend the majority of their time working on their long game rather than their putting
In order to be a good putter, there are three things that you must to be able to do:
Understand how to read the greens (or browns)
Understand how to hit the ball where you are aiming
Control how far you hit the ball
In the majority of cases, poor putting can be caused by an inability to successfully carry out one or more of the above elements. Let’s discuss Stan’s putting and what we worked on in his lesson.
The positive areas of Stan’s putting
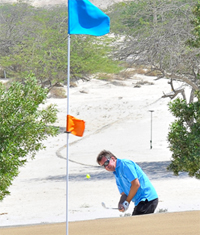
In complete honesty, I did fear the worst when I saw Stan address his first few putts. As you can see from Picture 1 where I have highlighted the position of the hole with a white dot, Stan’s putter is not aiming at the hole. In addition, his shoulders are pointing significantly left of the target. I understand that these comments do not sound like they should come under ‘positive areas of Stan’s putting’. However, Stan holed each of his first three putts. This is where putting is very individual. Clearly, Stan’s instincts on the putting green are very good. Our job was to make sure that these putts were not just lucky!
Initial changes to the set-up
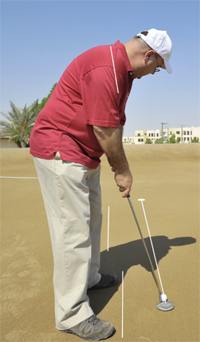
Naturally, our first job was to tidy up Stan’s set up to enable him to swing his putter down his target line. As you can see from Picture 2, Stan has managed to get his putter aiming towards the hole and get his shoulders almost parallel to the target line. Additionally, his feet and knees are also in a better position.
From this better set-up position, Stan went on to miss his next few putts. For Stan, it could have been tough to accept that when he did it ‘his way’, all the putts went in and when he did it ‘my way’, all the putts missed. However, what we need to understand with putting is that if we do not know exactly where we are aiming, any putt that goes in is effectively an accident. From the new set up, Stan knew where he was aiming and when you combine that with his good instincts, it is only a matter of time before you see an improvement.
At the start of the session, I asked Stan to hit five putts from 25 feet towards a hole that had a circle with a radius of three feet drawn around it. His score for the test was two out of five and the other three balls were fairly inconsistent. Throughout the lesson we discussed using the following routine:
Mark and clean the ball
Stand directly behind your marker and decide where you need to aim in order to get the ball into the hole. Identify a specific point on the green (ie, one foot right of the hole).
Crouch down and line the logo of your ball up so that it is pointing one foot to the right of the hole.
Stand directly behind the ball and ask yourself “If I hit the ball where that logo is pointing, do I honestly believe it will go in the hole?” If the answer is no, repeat steps three and four until the answer is yes!
Carry out some practice strokes whilst looking at the hole to help gauge the speed of the putt.
Line your putter up so that it is perpendicular to the logo, take one look at the hole and let the stroke go.
Accept the outcome as you cannot control it
The beauty of this routine is that you can literally know exactly where you are aiming before you hit your putt. As long as you confirm in your brain that your ball is lined up correctly, all you have to consider is the speed of the putt. Furthermore, it allows you to become more accountable for your putting. For example, if you carry out the routine properly and consistently miss putts left of the hole, you can quickly identify issues with your stroke or green reading. Having an explanation also makes it easier to carry out step seven of the routine!
Evaluation
Stan clearly had some set up issues at the beginning of the session and by improving his set up and alignment, his stroke naturally worked better. His distance control was always very good and once he employed the pre-shot routine which allowed him to know exactly where he was aiming, the outcome improved. When we carried out the same test from 25 feet but using the pre-shot routine, Stan scored four out of five and the ball that missed was only just short of the circle
Stan’s verdict
I got the look ... Up until today I never knew whether to look at the ball or look at the hole. Try doing both and you end up panicking and missing the shot completely. I’m looking at the hole during my practice putts to judge the distance and speed and looking at the ball when it comes to playing it down that hole. Lining up the ball with the sneaky logo line and the placement of feet, making sure the grip is correct and bingo, I’m a brown boy in the ring ... tra la la la la la.